TL;DR: Centrali's schema discovery scans your schemaless collections, detects every field across your records, infers types with confidence scores, and lets you accept suggestions to build a validated schema — no manual property definition required. Run it from the console's AI tab in one click.
Schemaless collections are great for ingesting unpredictable data. Webhook events from six different providers. API responses you don't fully control. CSV imports where the columns keep changing. You write whatever JSON shows up, and Centrali stores it.
But sooner or later, you want structure. You want the console to show typed columns instead of raw JSON. You want filters and Smart Queries to know that amount is a number and created is a date. You want validation to catch bad records before they land.
That's what schema discovery does. It reads your existing records, infers a schema from real data, and lets you review and accept it — field by field or all at once.
Prerequisites
Any schemaless collection with records works. For this walkthrough we'll use a collection called webhook-events-demo that holds 28 webhook events from Stripe, GitHub, Shopify, Twilio, Slack, and SendGrid — each with a different shape. The same flow applies to any schemaless collection, webhook-related or not.
Step 1: Open the AI Tab
Navigate to your collection in the console and click the AI tab. You'll see three sub-tabs: Validation, Insights, and Schema Discovery. Click Schema Discovery.
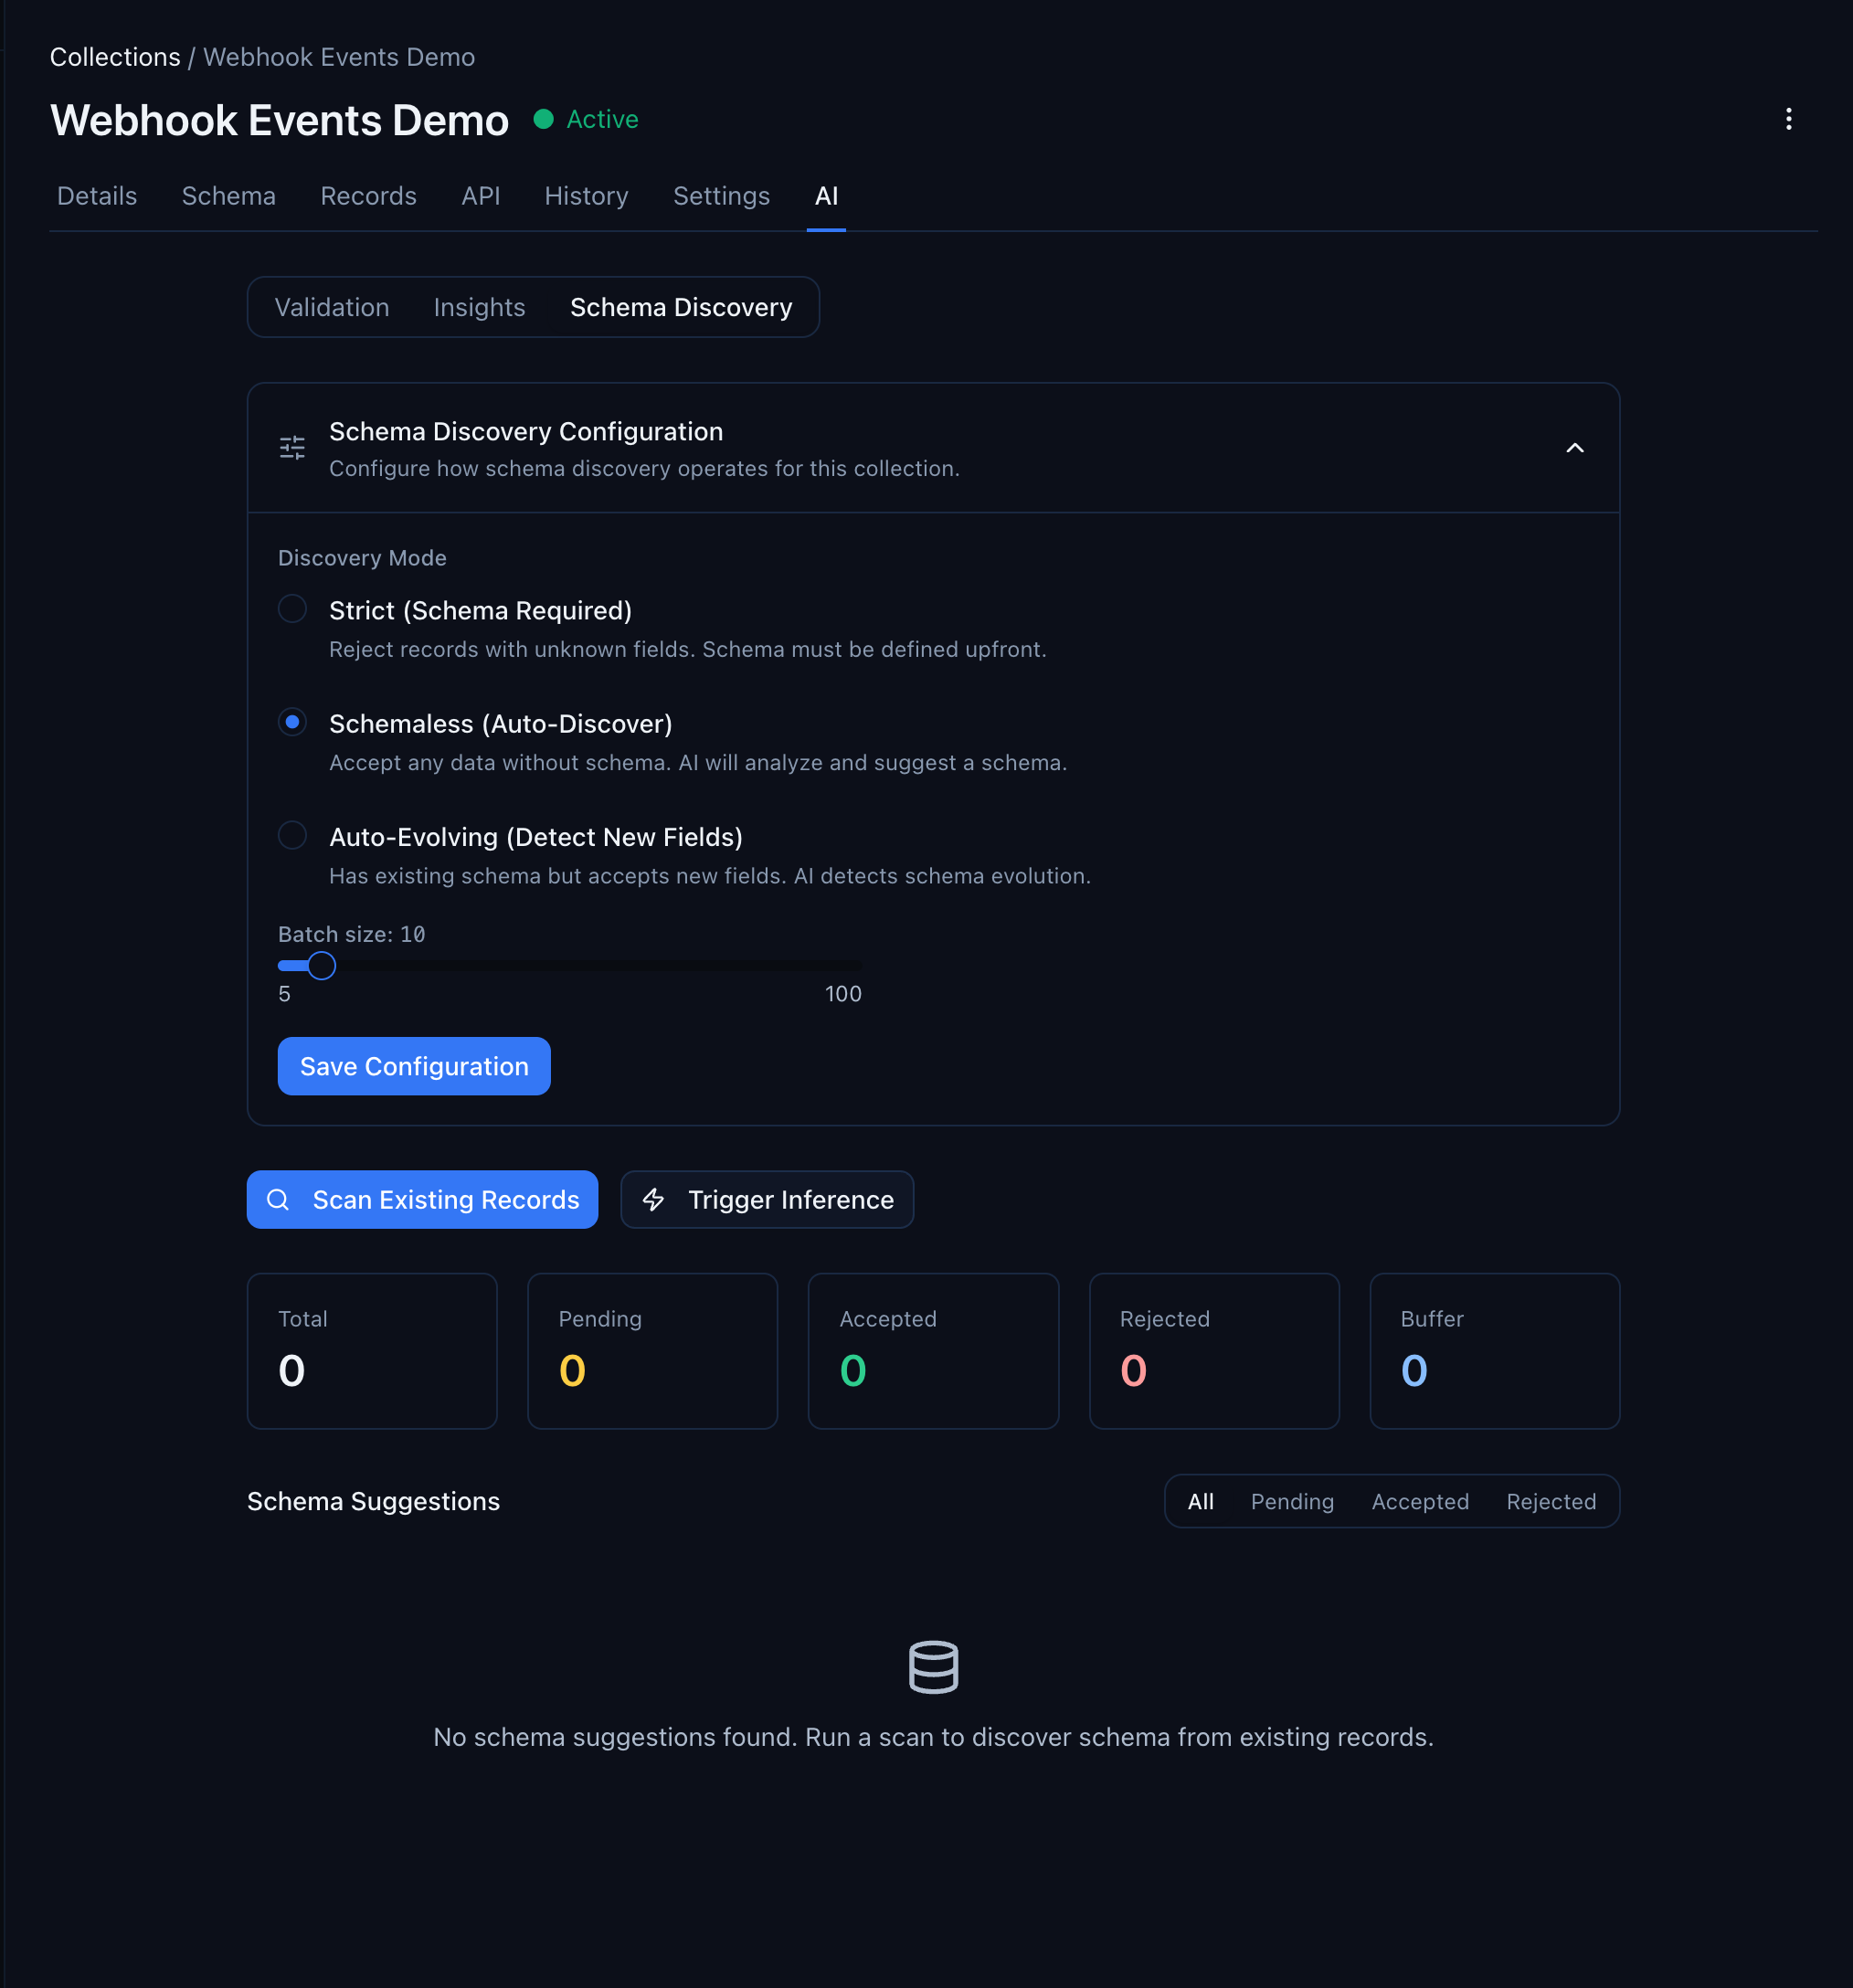
The page has three parts:
- Schema Discovery Configuration — set the discovery mode (Strict, Schemaless, or Auto-Evolving) and the batch size for automatic inference
- Action buttons — Scan Existing Records (analyze what's in the database) or Trigger Inference (process buffered records)
- Schema Suggestions — the results. Empty until you run a scan
Step 2: Run a Scan
Click Scan Existing Records. This samples up to 50 records from your collection (configurable up to 200) and analyzes them for field names, types, and patterns.
The scan runs in the background. Within a few seconds, the summary cards update:
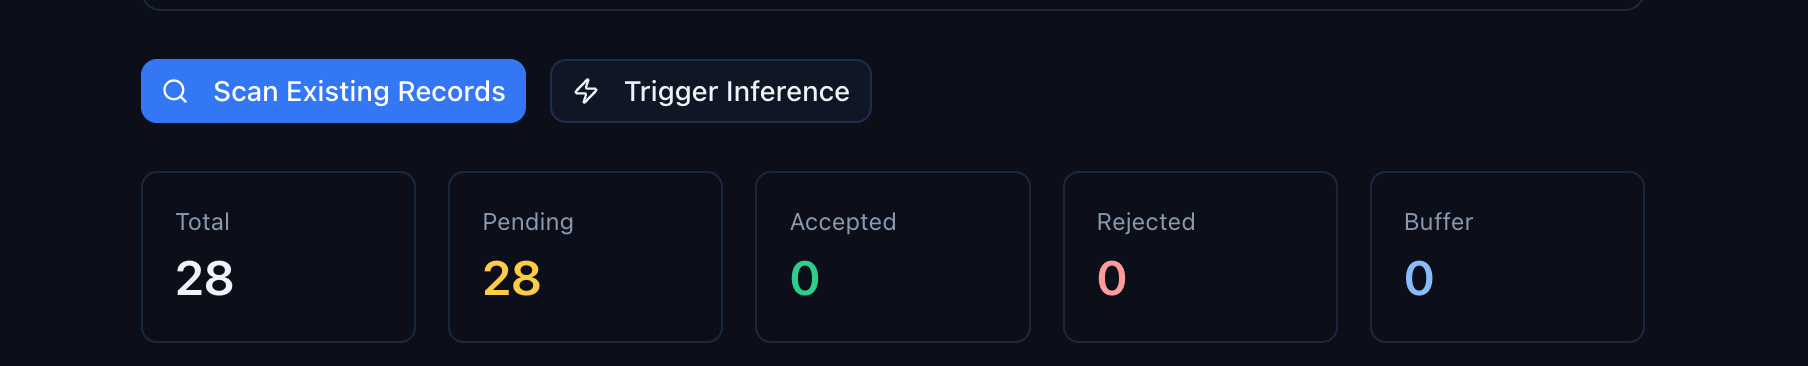
- Total — how many suggestions have been generated across all scans
- Pending — suggestions waiting for your review
- Accepted — suggestions you've approved (properties added to the collection)
- Rejected — suggestions you've dismissed
- Buffer — records queued for the next automatic inference batch
Step 3: Review Suggestions
Below the summary cards, the Schema Suggestions table shows every field the scan discovered:
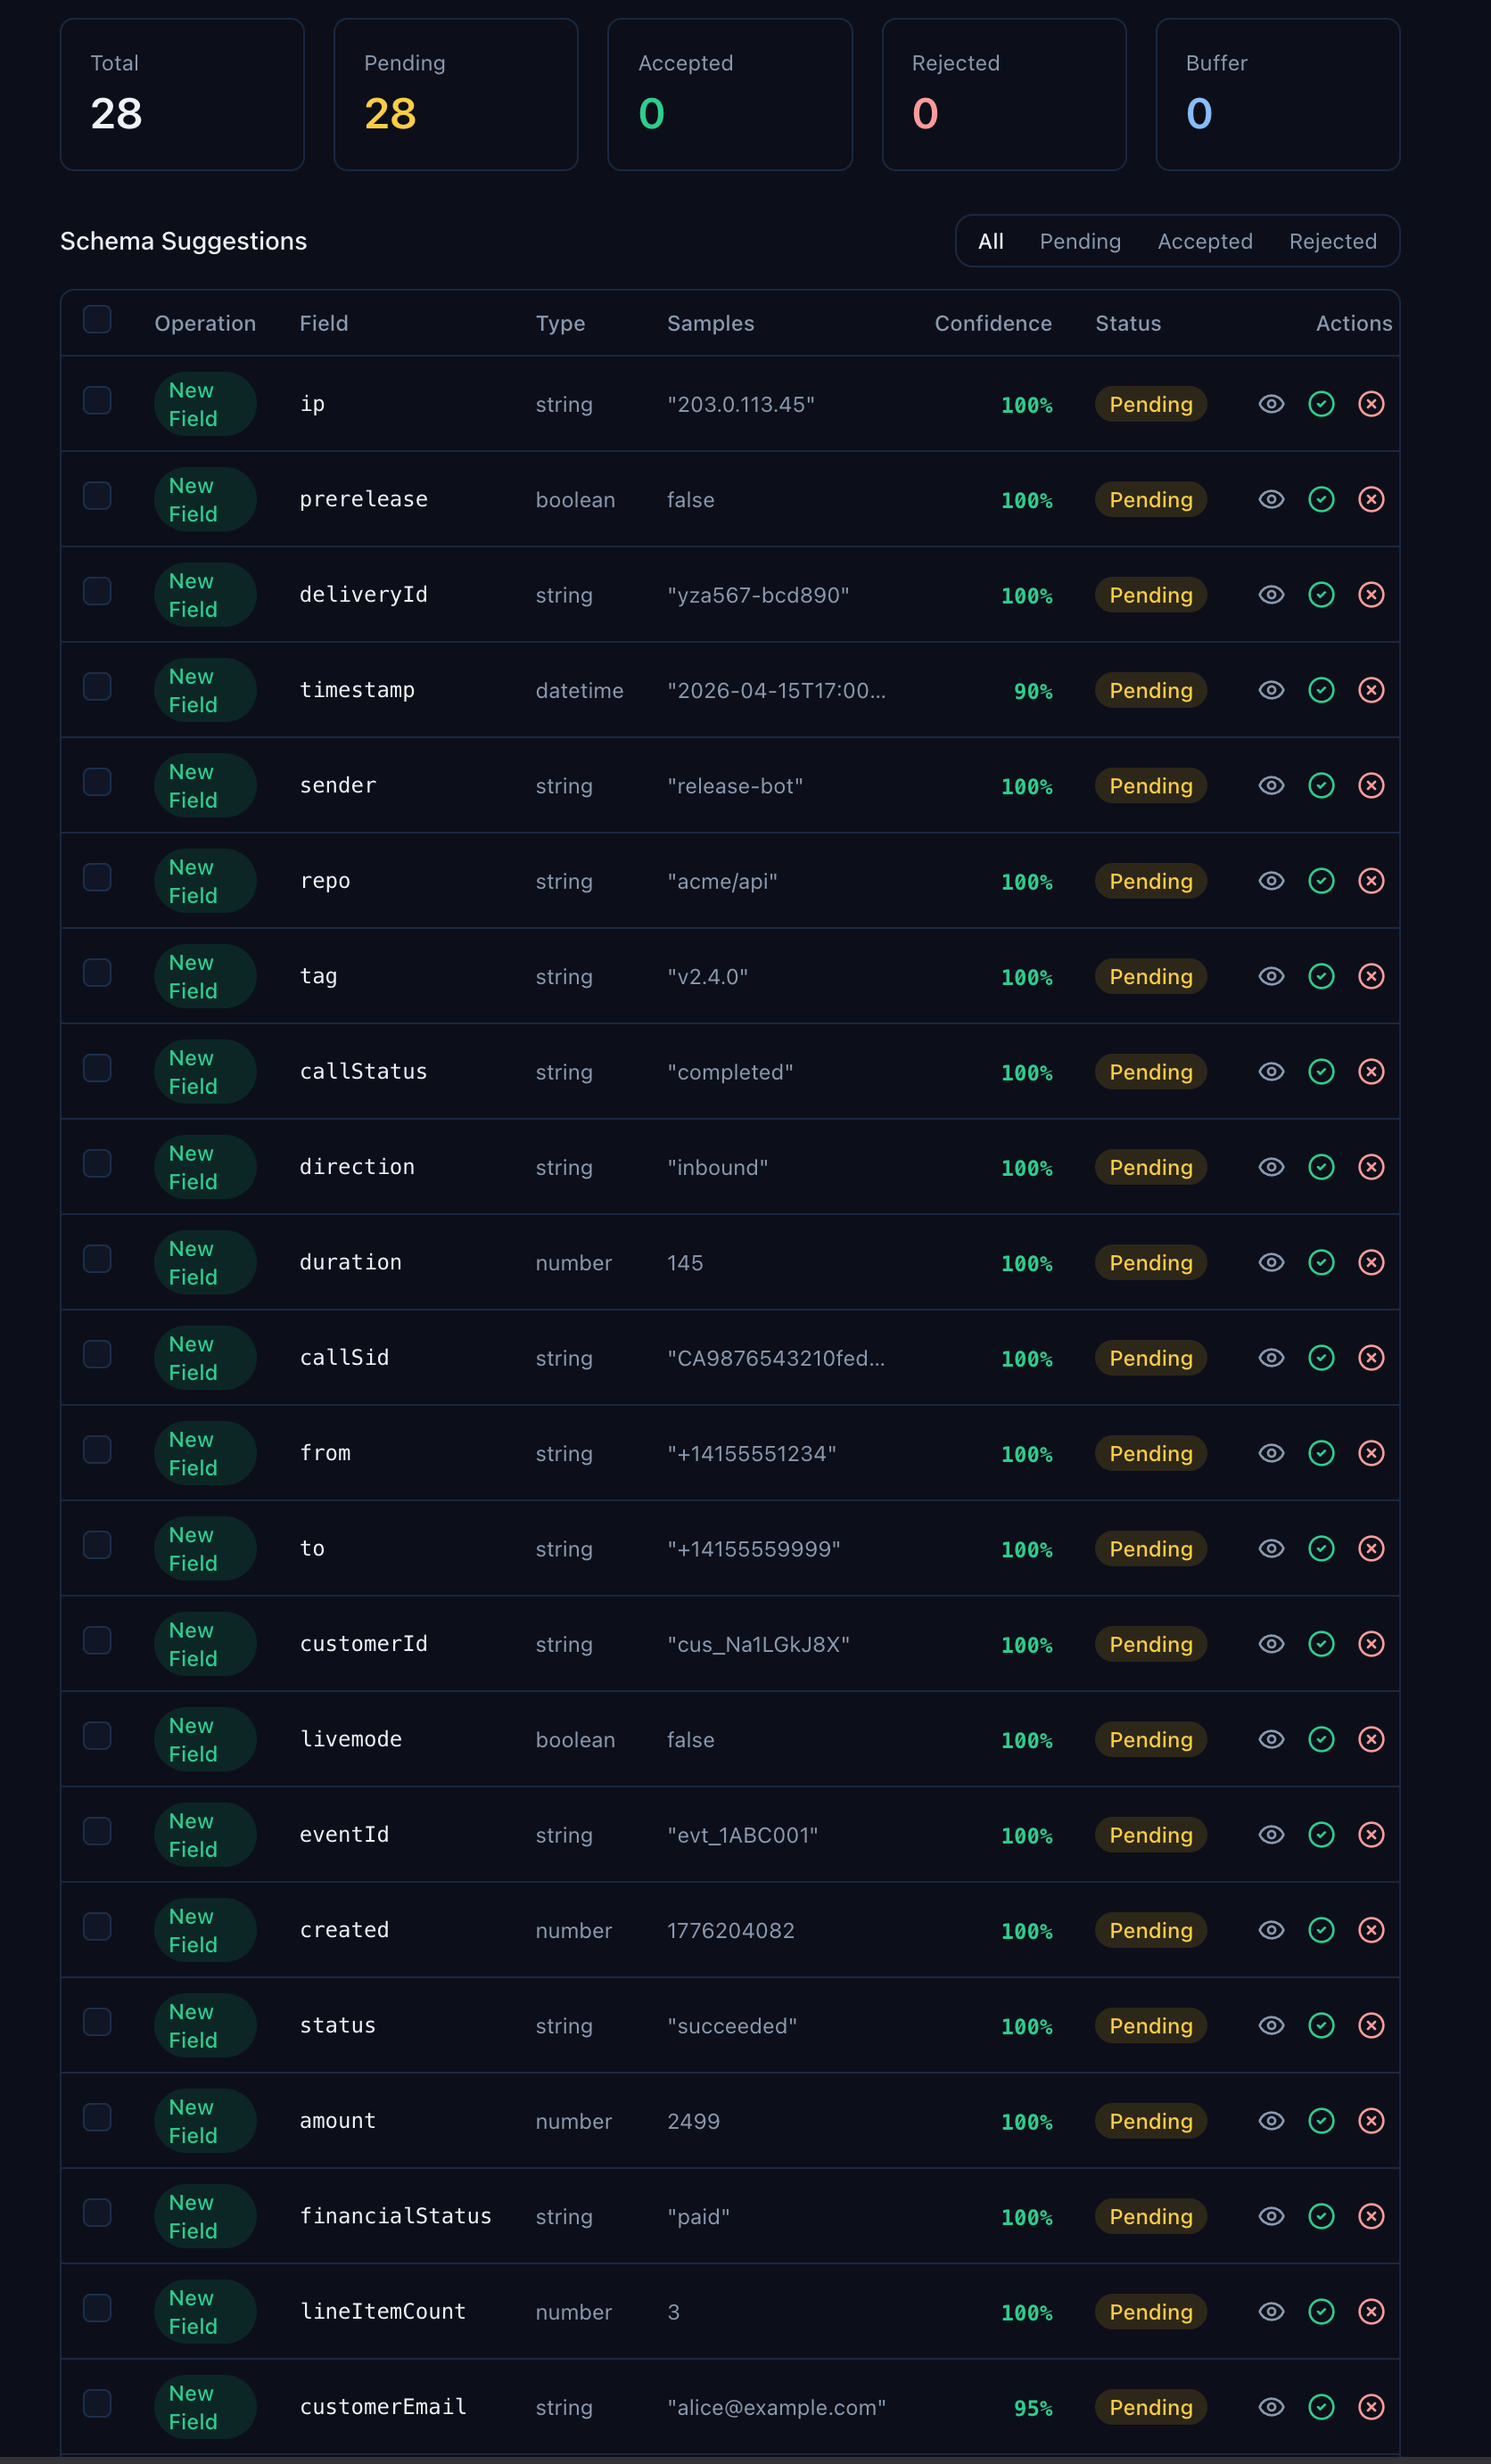
Look at the variety in that table. callStatus from Twilio records. repo from GitHub. financialStatus from Shopify. customerId from Stripe. bounceReason from SendGrid. The scan found every unique field across every provider — 28 records, 28 distinct fields inferred.
Each suggestion includes:
| Column | What it tells you |
|---|---|
| Operation | New Field for fields not on the schema yet, Update Type if the inferred type differs from an existing property |
| Field | The field name as it appears in your records |
| Type | The inferred type — string, number, boolean, datetime, object, or array |
| Samples | Up to 3 example values from your actual data |
| Confidence | How confident the inference is, based on consistency across sampled records. Most will be 100% |
| Status | pending, accepted, or rejected |
The confidence score is your friend. Fields that appear in every record with the same type hit 100%. Fields that only appear in a subset — like duration (only on call events) or bounceReason (only on email bounces) — still get picked up, often at 100% because when they do appear, they're consistent.
You can filter the table by status using the toggle at the top right — useful when you've already accepted some and want to focus on what's left.
Step 4: Accept or Reject
For each suggestion, you have two choices:
- Accept — adds the field as a typed property on the collection. It becomes a filterable, sortable column in the Records view and is available in Smart Queries.
- Reject — dismisses the suggestion. The field still exists in your records' data, but it won't become a formal property.
To accept many at once, check the boxes on the suggestions you want, then click Accept All Selected. You'll get a confirmation dialog:

Confirm and the properties are added in one transaction.
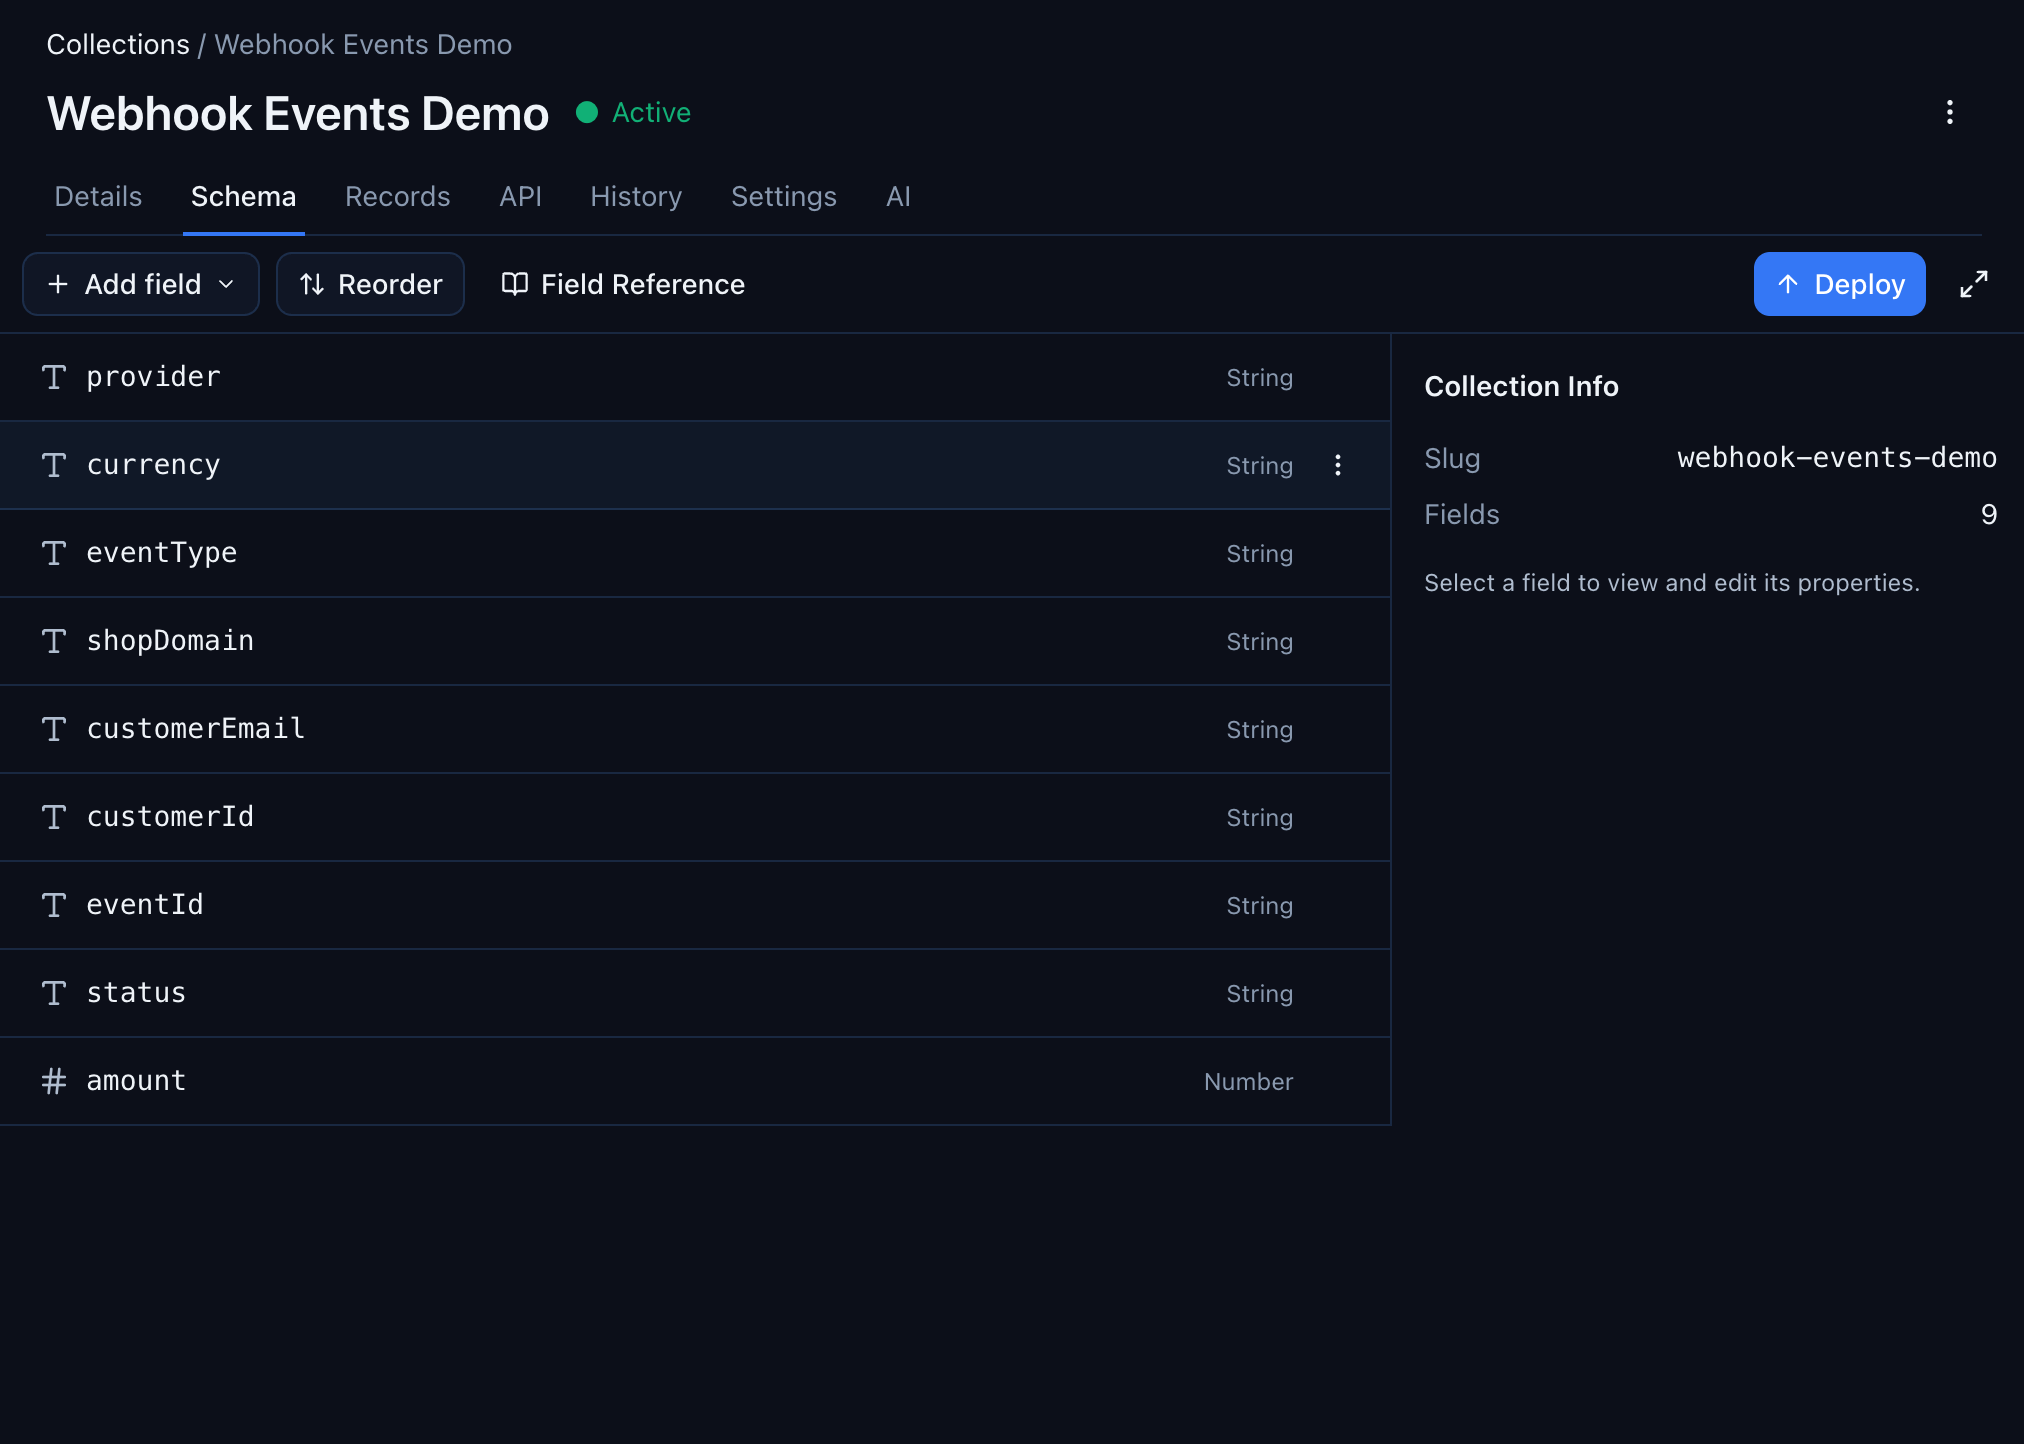
Step 5: See the Result
After accepting suggestions, go back to the Schema tab. Your collection now has typed properties — all discovered from real data, not defined manually:
The Records tab also updates — columns that were previously hidden in raw JSON now appear as first-class sortable, filterable fields:
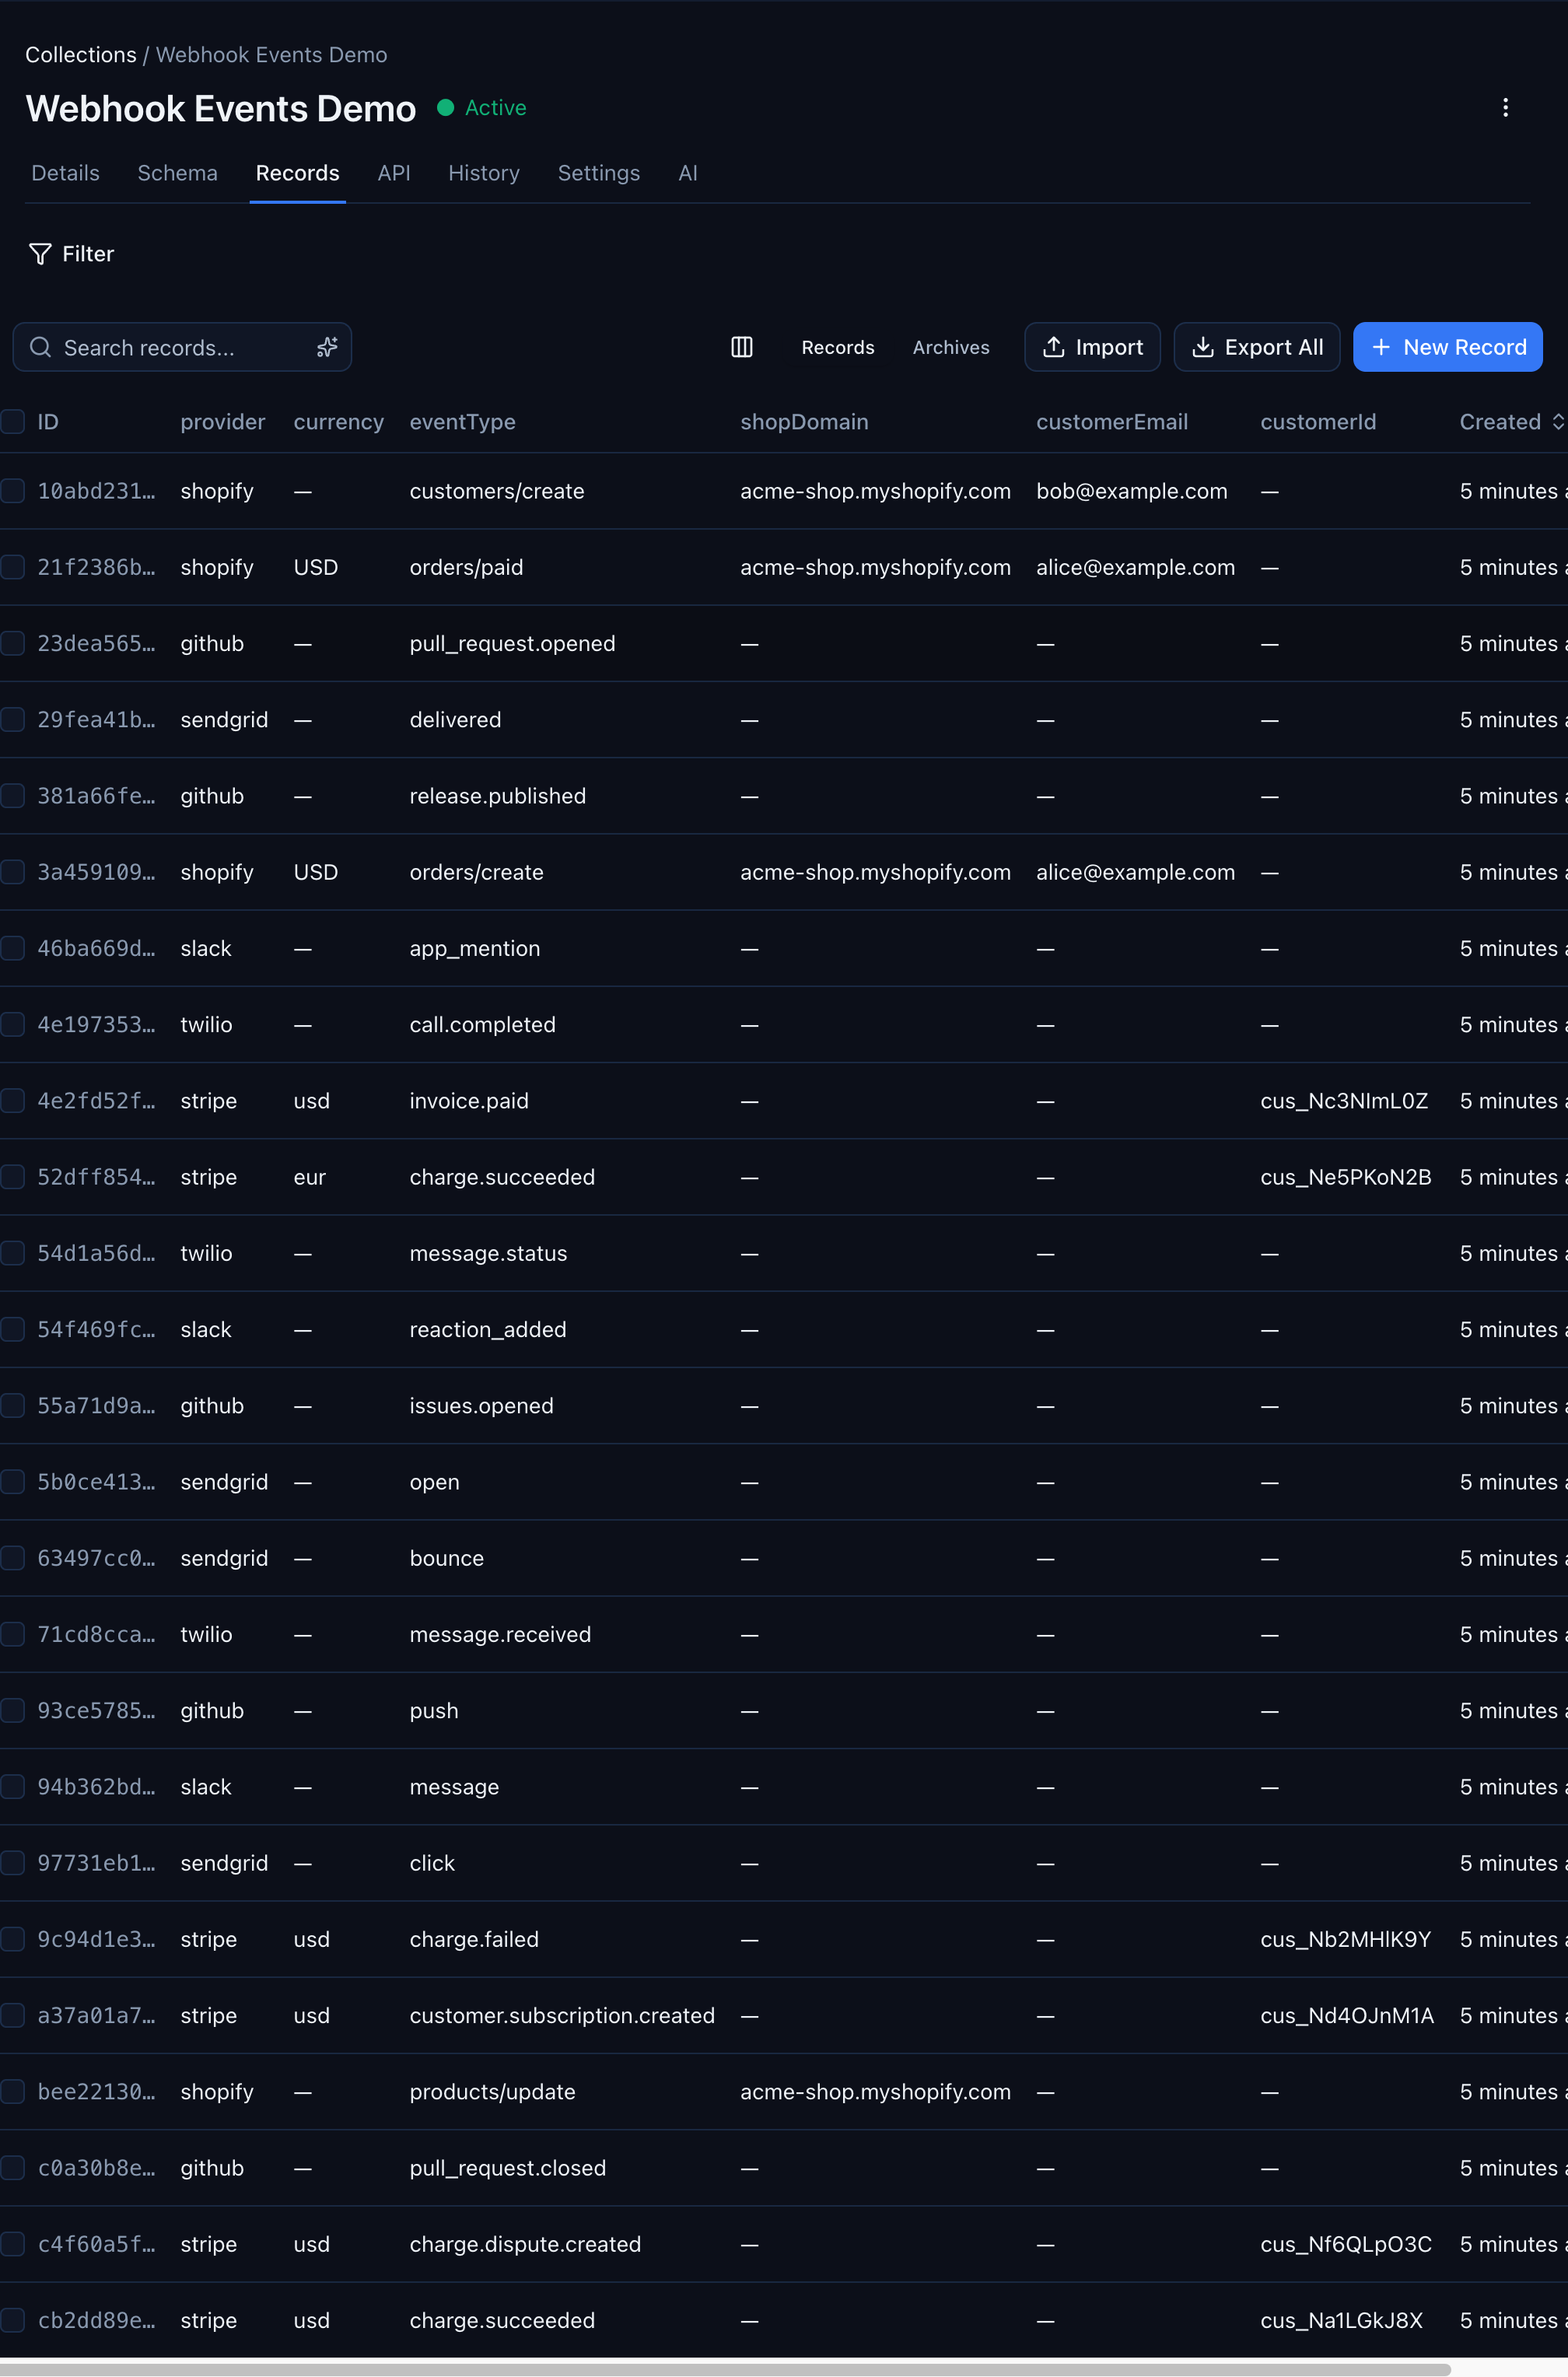
Stripe records show their customerId, Shopify records show their shopDomain and customerEmail, GitHub records show their eventType — all in the same typed grid. No coding, no SDK calls, no manual schema design.
The Three Schema Modes
Schema discovery works differently depending on your collection's mode:
| Mode | Behavior | When to use |
|---|---|---|
| Schemaless | No validation. Any JSON accepted. Discovery suggests fields from what it finds. | Starting out. You don't know the shape yet. |
| Auto-evolving | Known fields are validated. Unknown fields are accepted and buffered for discovery. | Your schema is mostly stable, but new fields occasionally appear. |
| Strict | Full validation. Extra fields are rejected. | Schema is locked down. No surprises. |
The typical progression:
- Start schemaless — ingest freely while you figure out the data shape
- Run schema discovery — let the system learn from your real data
- Accept suggestions — build the schema from what's actually there
- Switch to auto-evolving — validate known fields, still accept new ones
- Eventually go strict — once the schema is stable and you want hard validation
You can change the mode at any time from the Schema Discovery Configuration section at the top of the AI tab. No data migration needed — existing records are unaffected.
Automatic vs. Manual Discovery
Schema discovery works two ways:
Automatic (buffer-based): In schemaless and auto-evolving modes, every new record is added to a buffer. Once the buffer reaches the batch size (default: 10 records), inference runs automatically and generates suggestions. You don't have to click anything — suggestions appear as data flows in.
Manual (scan-based): Click "Scan Existing Records" to analyze what's already in the collection. This is useful when you've imported data in bulk, or when you want to re-scan after changing the configuration. The scan samples up to 200 records in a single pass.
Both paths produce the same suggestions table. The difference is timing — automatic runs continuously as data arrives, manual runs when you ask.
Configuration
The Schema Discovery Configuration section lets you tune the inference engine:
| Setting | Default | What it controls |
|---|---|---|
| Batch size | 10 | How many buffered records trigger automatic inference |
| Max keys per record | 100 | Upper limit on fields analyzed per record |
| Max nesting depth | 3 | How deep into nested objects the scan looks |
| Max string length sampled | 1,000 | Longest string value considered for type inference |
The defaults work well for most collections. Raise the batch size if you're receiving high-volume events and don't want inference running on every 10th record.
What's Next
- Store Stripe Webhook Events and Query Them Forever — start ingesting into a schemaless collection
- Ingest Webhooks From Any Provider — GitHub as the Example — the same storage pattern works for any provider
- Query Stripe Webhook Events Like a Database — once you've built the schema, use it to create Smart Queries
- Get Alerted When a Stripe Charge Fails — add real-time alerting on top of typed event data